Using Xinetd with GitHub Hooks
2019-04-05Recently, I needed to set up a static site and have it automatically update when I push changes to git.
It seems gratuitous to run a service to handle a single endpoint and do a pull. The site was static so it didn't need anything other than NGINX and it was running on a VPS so I wanted to use as little memory as possible.
Looking around I found a few scripts that would work but even the smallest one (python) seemed to use about 18mb of ram when running. I also didn't know the pedigree of these scripts and didn't want to have to babysit them if they weren't completely stable.
Enter xinetd
xinetd is an internet super-server originally written in 2003 or earlier. It is still actively maintained and included in most Linux distributions. Unlike most of the options, I considered it's written in plain C so it uses a bare minimum of resources.
Xinetd works in the Unix tradition of doing one simple thing and doing it well. It will listen on a port (in our case a TCP port) and when something connects it will start a process and map the stdin/stdout to the socket. That's it! Since your process only needs to read/write from standard input/output you have a lot of flexibility in what you use to handle the response. Xinetd will start a new copy of the process for each request so if it crashes the socket will be closed and the next request starts fresh.
Configure NGINX
First, let's get the NGINX config out of the way.
We don't want to open a new port on our firewall just for xinetd so we'll do a proxy_pass from our web server to hit a port on localhost. This will also let NGINX handle HTTPS so the data going over the intent is encrypted.
location /update {
    proxy_pass http://localhost:61000/;
}
Configure xinetd
If you don't have xinetd installed you can get it with your local neighborhood package manager. apt-get install xinetd if you're on Debian/Ubuntu.
Then we add our service definition to /etc/xinetd.d/. Create a new file called GitHub-hooks and add this:
service GitHub-hooks
{
    type        = UNLISTED
    socket_type = stream
    protocol    = tcp
    port        = 61000
    wait        = no
    user        = user1
    server      = /home/site/bin/githook
    instances   = 2
}
Most of the lines here are fairly self explanatory but I'll go through the interesting ones briefly. If you need more details on what options are available consult the xinetd man page.
- type = unlisted
This tells xinetd that your service doesn't need to appear in /etc/services. You could edit /etc/services and add your service and omit this line but this is simpler. - user = user1
For security, you don't want the xinetd services to run as root so it will execute the handler as the user you specify. You definitely don't want to use the same user you log in as here. Create a new user with only the permissions it needs. (You can also specify a group with group=) - server = /home/site/bin/githook
This is what gets run when a connection is made from the outside. - instances = 2 This limits the number of concurrent instances of this service. Since it doesn't make sense to have 2 git pull going on at once we limit this to a single instance. Technically git's internal locking should keep the repository consistent without this but this would be more resilient to a DOS attempt.
After this file is in place you can restart xinetd sudo service xinetd restart on a Debian or Ubuntu machine. According to the man page, you can also send SIGHUP to reload the configuration. Run sudo service xinetd status to make sure the service started without error.
Implementing The Handler
Now that xinetd is running we can edit the handler and re-run our request.
The first thing to keep in mind is that xinetd doesn't speak HTTP so we have to do some parsing. Unfortunately, most HTTP libraries don't support reading from stdin directly. On the other hand, it's a text protocol so we should be able to pull out what we need without much fuss.
Choosing the Right Tool
While I'm usually the first one to suggest a statically typed language for any project when I expect the entire script to fit on a single screen it might be overkill. Python is already installed and should let us get this done with little ceremony.
Parsing HTTP
For our purposes, HTTP is a pretty simple protocol. We only need to handle requests from the GitHub hook so we can take a few shortcuts. 😈
Here is a sample of the HTTP headers I expect from GitHub.
Connection: close
Content-Length: 7547
Accept: */*
User-Agent: GitHub-Hookshot/903858c
X-GitHub-Event: push
X-GitHub-Delivery: b6eb5d30-4e96-11e9-9f14-dfd1cb48de87
content-type: application/json
X-Hub-Signature: sha1=0c27835e1218ac56a303cb02716b8f0cfbd90445
First, we will get the HTTP headers which are line delineated. The only one that we need to care about is the Content-Length header which will tell us how many bytes to read when we get to the payload. If we want this to be more general purpose we would check the content-type but since we are configuring the hook I will assume it's correct. Likewise, validating the X-Hub-Signature is left as an exercise to the reader.
if line.startswith("Content-Length:"):
    lenstr = line.split(':')[1].strip()
    length = int(lenstr)
If we encounter a blank line we know we're done with the headers and can read the payload and attempt to decode it as JSON.
if isBlank(line):
    data = sys.stdin.read(length)
    payload = json.loads(data)
Then we just need to respond to the caller by writing an HTTP status code to stdout. I choose to send the response before starting the git pull so the calling process does not need to wait for an acknowledgment. I don't attempt to indicate whether the git pull succeeded or not in the HTTP response.
print "HTTP/1.1 200 OK\n\nkkthxbye"
For reference here is the complete script.
#!/usr/bin/python

import sys, os, fileinput, json, subprocess
from os.path import expanduser

REPO_FULL_NAME = "ericharding/OptimalStake"
REPO_LOCAL_PATH = expanduser("~/www/")
LOG_PATH = expanduser("~/gitlog.txt")

length = 0
payload = {}
def isBlank(x): return not x.strip()
def log(x):
    with open(LOG_PATH,"a") as f:
        timeStamp = datetime.datetime.now().strftime("[%Y-%m-%d %H:%M] ")
        f.write(timeStamp + x + '\n')

while True:
    line = sys.stdin.readline()
    if line.startswith("Content-Length:"):
        lenstr = line.split(':')[1].strip()
        length = int(lenstr)
    if isBlank(line):
        if length > 0:
            data = sys.stdin.read(length)
            end = data.rfind('}')+1
            data = data[:end]
            payload = json.loads(data)
        break

print "HTTP/1.1 200 OK\n\nkkthxbye"

repoName = payload['repository']['full_name']
repoId = payload['repository']['id']
sender = payload['sender']['login']

log("Request update '{0}' id={1} by '{2}'".format(repoName, repoId, sender))
if repoName == REPO_FULL_NAME:
    os.chdir(REPO_LOCAL_PATH)
    subprocess.call(["git", "pull"])
Security
Any time you hook some code up to the internet you should spend a few minutes thinking about what could go wrong.
Malformed Messages
- The message might not be valid HTTP
The NGINX proxy_pass will only forward valid http messages. If the message wasn't valid the web server wouldn't know where to route the request. - The message might not have a Content-Length
When we reach a blank line we will not try to parse the JSON. Then we return 200 OK and promptly crash. Since this process was only supposed to live for the duration of the request this is A-OK. Since xinetd is limited to a single instance it would be reasonably difficult to exhaust the server's resources this way. - The payload is not JSON
The script will crash as intended. 👍
Well-Formed but Fake messages
-
We get a message that isn't from GitHub but looks like it is
We will issue a pull request which will finish quickly since there are no changes. The script will not be run again until the pull finishes so only one will be in flight at a time but it could effectively be runninggit pullin a loop. This could definitely get us censured by GitHub eventually.The fix for this is to check the
X-Hub-Signatureand verify that the message payload is signed by GitHub. This is actually pretty easy and there is some sample code for how to accomplish this here.For defense in depth, we could also configure the xinetd
cpsoption which will set a maximum number of requests per second and a backoff time if it is exceeded. I don't think this can go below 1 so this isn't something you should rely on as your only method of defense.gg
And finally...
The GitHub Part
Setting up the WebHook on GitHub is very easy. There are 2 steps:
Set up a Read-only Deploy Key
First you will need to set up a deploy key. This key will only be used on the production machine and it will give it read-only access to the repository. If you ever suspect the machine has been compromised you can simply revoke the key from the GitHub UI.
GitHub has great documentation for setting up a Deploy key so I won't repeat it here. You can read it at https://developer.GitHub.com/v3/guides/managing-deploy-keys/#deploy-keys. It's just like adding an SSH key to your profile but you do it in the repository settings.
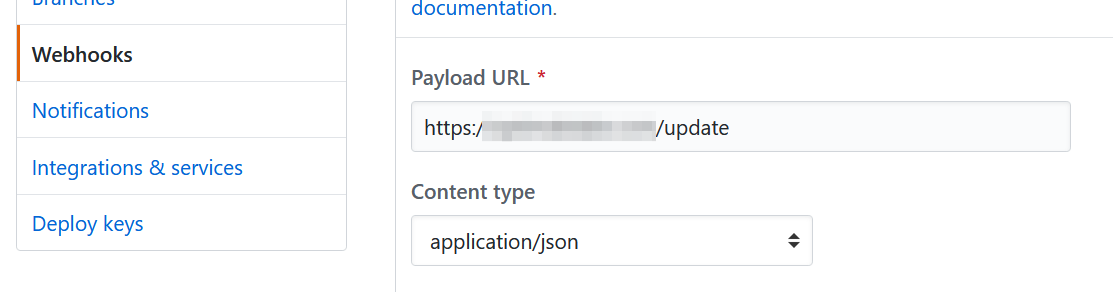
Configure the WebHook
Now add the webhook with your chosen URL. Set the content type to application/json instead of form encoding or the script above won't be able to decode it. The 'Secret' is used to generate the X-Hub-Signature so you'll need it if you want to validate the signature. For this use case, we only need the push event but you can use xinetd/python to add webhooks for other sorts of events.
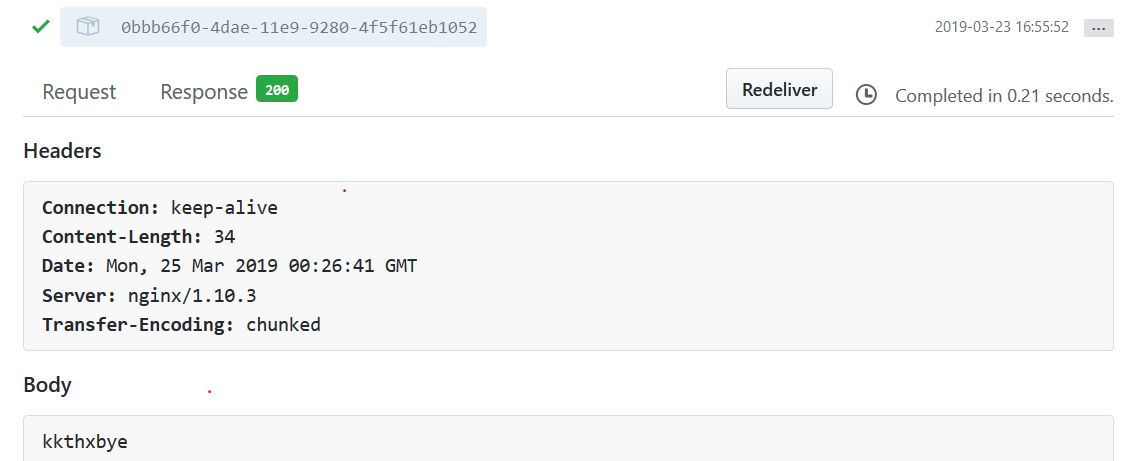
Once you activate the hook you can see a list of recent deliveries. Expand one to see the headers and payload of the delivery. If the request was successful you can also see the response details. If the request is unsuccessful use the log function and the Redeliver button to gather more information.
If everything works as intended you should see something like this.
That's it!
Now you can test your hook by pushing a change. GitHub should call your web hook which will invoke the script and pull the latest change using your deploy key. Easy to set up and uses minimal resources. One instance of xinetd can be configured to handle any number of different repositories.